My kids are SO CREATIVE, its crazy, really. I’m constantly blown away by their resourcefulness and ingenuity. They find ways to use materials that are not only surprising, but delightful. So I decided to surprise and delight them for a change!
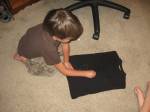
First I pulled from their closets two plain, solid colored t-shirts. I dug around and found some plexi glass, and a small piece of chalkboard chalk that I broke into two, because, well, four and six year olds aren’t famous for their ability to share. 🙂
We’ve all had bleach mishaps. How many shirts and pants have been relegated to the “weekend wear” because a surprise bloom of bleach spots appeared mysteriously? We’re going to be using bleach in this project, don’t want any surprises!! The plexi glass is the perfect size to slip into the shirts to keep the bleach from bleeding through. Its also a very sturdy surface and was easy for the kids to work on.
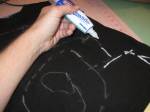
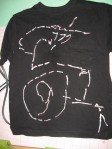
The kids literally sketched with the chalk a design onto the t-shirt. Once the kids were finished with their designs it was time for mom to take over. Beware, bleach pens smell like bleach, and while the fumes were not nearly so noxious as regular bleach, I’d still have a fan blowing or a window open if I were you. The bleach “pen” is actually a tube of gelatinous bleach and so it stays where you put it. I carefully laid a line of bleach gel on all of the chalked lines of the kids’ designs. You don’t have to lay it down super thick, but you definitely want coverage. After I was done going over the outlines on both shirts, we set them aside and went off to do “something else.” About twenty minutes later we returned and the kids were SURPRISED and DELIGHTED to see the shirt was changing colors everywhere there was bleach!!!
When they realized their designs were becoming a permanent part of their shirts their eyes really started to shine. Like I mentioned, we let it sit for about twenty minutes, but you can let it stand for more or less time depending on the color you want the design to be. For example, with the green shirt, if we’d rinsed it ten minutes earlier my daughter’s fairy would have been yellow instead of white. Darker colors take longer go bleach than lighter colors, so if you want white lines on a black shirt you may have to let it sit for a l-o-n-g time.
We took the shirts to the sink to rinse. Be careful. The gel starts to set and actually flakes off. You don’t want to submerge the shirt and work the bleach out that way, you want to hold the design under running water and slowly flake the gel off.
Our freshly rinsed t-shirts:
We hung them to dry, but you could have just as easily popped them in the dryer.
They are so proud of themselves! And my son has worn his shirt three days in a row… 🙂
Happy Crafting!
Materials for this project:
*Bleach Pen
*Solid Color T-Shirts
*Chalkboard Chalk
*Cardboard, chip board, or some other firm surface to put in the shirt as a work surface and to keep the bleach from bleeding through.
*Imagination, creativity, and a smile.
